Configure video encoding
Customer satisfaction with your Video Calling integrated app depends on the quality of video and audio it provides. The sharpness, smoothness, and overall quality of the video is directly linked to the frame rate, bitrate, and other video encoder settings. Choosing improper settings can result in poor video quality. Conversely, if the settings are too demanding, the available bandwidth quickly gets choked, leading to a suboptimal experience for your users.
This page guides you on configuring the video encoder settings to ensure optimal video quality in your Interactive Live Streaming app.
Understand the tech
In Video SDK you can set the video dimensions, framerate, bitrate, orientation mode, and mirror mode by specifying a video profile. You can also set the degradation preference to specify how video quality is degraded under suboptimal network conditions.
Resolution, frame rate, and bitrate
-
Resolution: Defines the video encoding resolution in pixels. The default value is
960 × 540. Higher resolutions generally result in better video clarity. Note that this parameter does not determine the final video orientation. Refer to Video orientation for setting the video output orientation. -
Frame rate: Represents the number of frames encoded per second (FPS). The default value is
15FPS. A higher frame rate contributes to smoother video playback. For scenarios demanding high video smoothness, consider setting this parameter to20or25. It is advised not to exceed a frame rate of30. -
Bitrate: Indicates the video encoding bitrate in Kbps. The default mode is set to Standard Bitrate. In this mode, the Video SDK dynamically sets an appropriate bitrate based on the channel profile, resolution, and frame rate.
To find a suitable bitrate for a given combination of dimensions and framerate, refer to the Video profiles table.
To achieve high video quality, it's crucial to maintain a balanced relationship between resolution, bitrate, and frame rate. Higher resolutions necessitate a higher bitrate. If the bitrate is fixed, an excessively high frame rate can reduce the resolution.
The configured parameter settings represent maximum values under ideal conditions. In cases where video quality cannot reach the set maximum values due to network constraints or other factors, the actual values are adjusted to match the specified maximum resolution, frame rate, or bitrate as closely as possible.
Video encoder configuration settings may affect billing. If settings are lowered due to adaptation, billing is based on the video resolution actually subscribed to by the user. For details, see Pricing.
Recommended video settings
The recommended video settings vary by scenario. For example, in a one-to-one online class, the video windows of the teacher and student are both large, which calls for higher resolution, frame rate, and bitrate. However, in a one-to-many online class, the video windows are smaller. You can set lower resolution, frame rate, and bitrate to accommodate bandwidth limitations.
Use the following as a guide when configuring video settings for these scenarios:
-
One-to-one video call:
- Resolution: 320 x 240; Frame rate: 15 fps; Bitrate: 200 Kbps.
- Resolution: 640 x 360; Frame rate: 15 fps; Bitrate: 400 Kbps.
-
One-to-many video call:
- Resolution: 160 x 120; Frame rate: 15 fps; Bitrate: 65 Kbps.
- Resolution: 320 x 180; Frame rate: 15 fps; Bitrate: 140 Kbps.
- Resolution: 320 x 240; Frame rate: 15 fps; Bitrate: 200 Kbps.
Video orientation
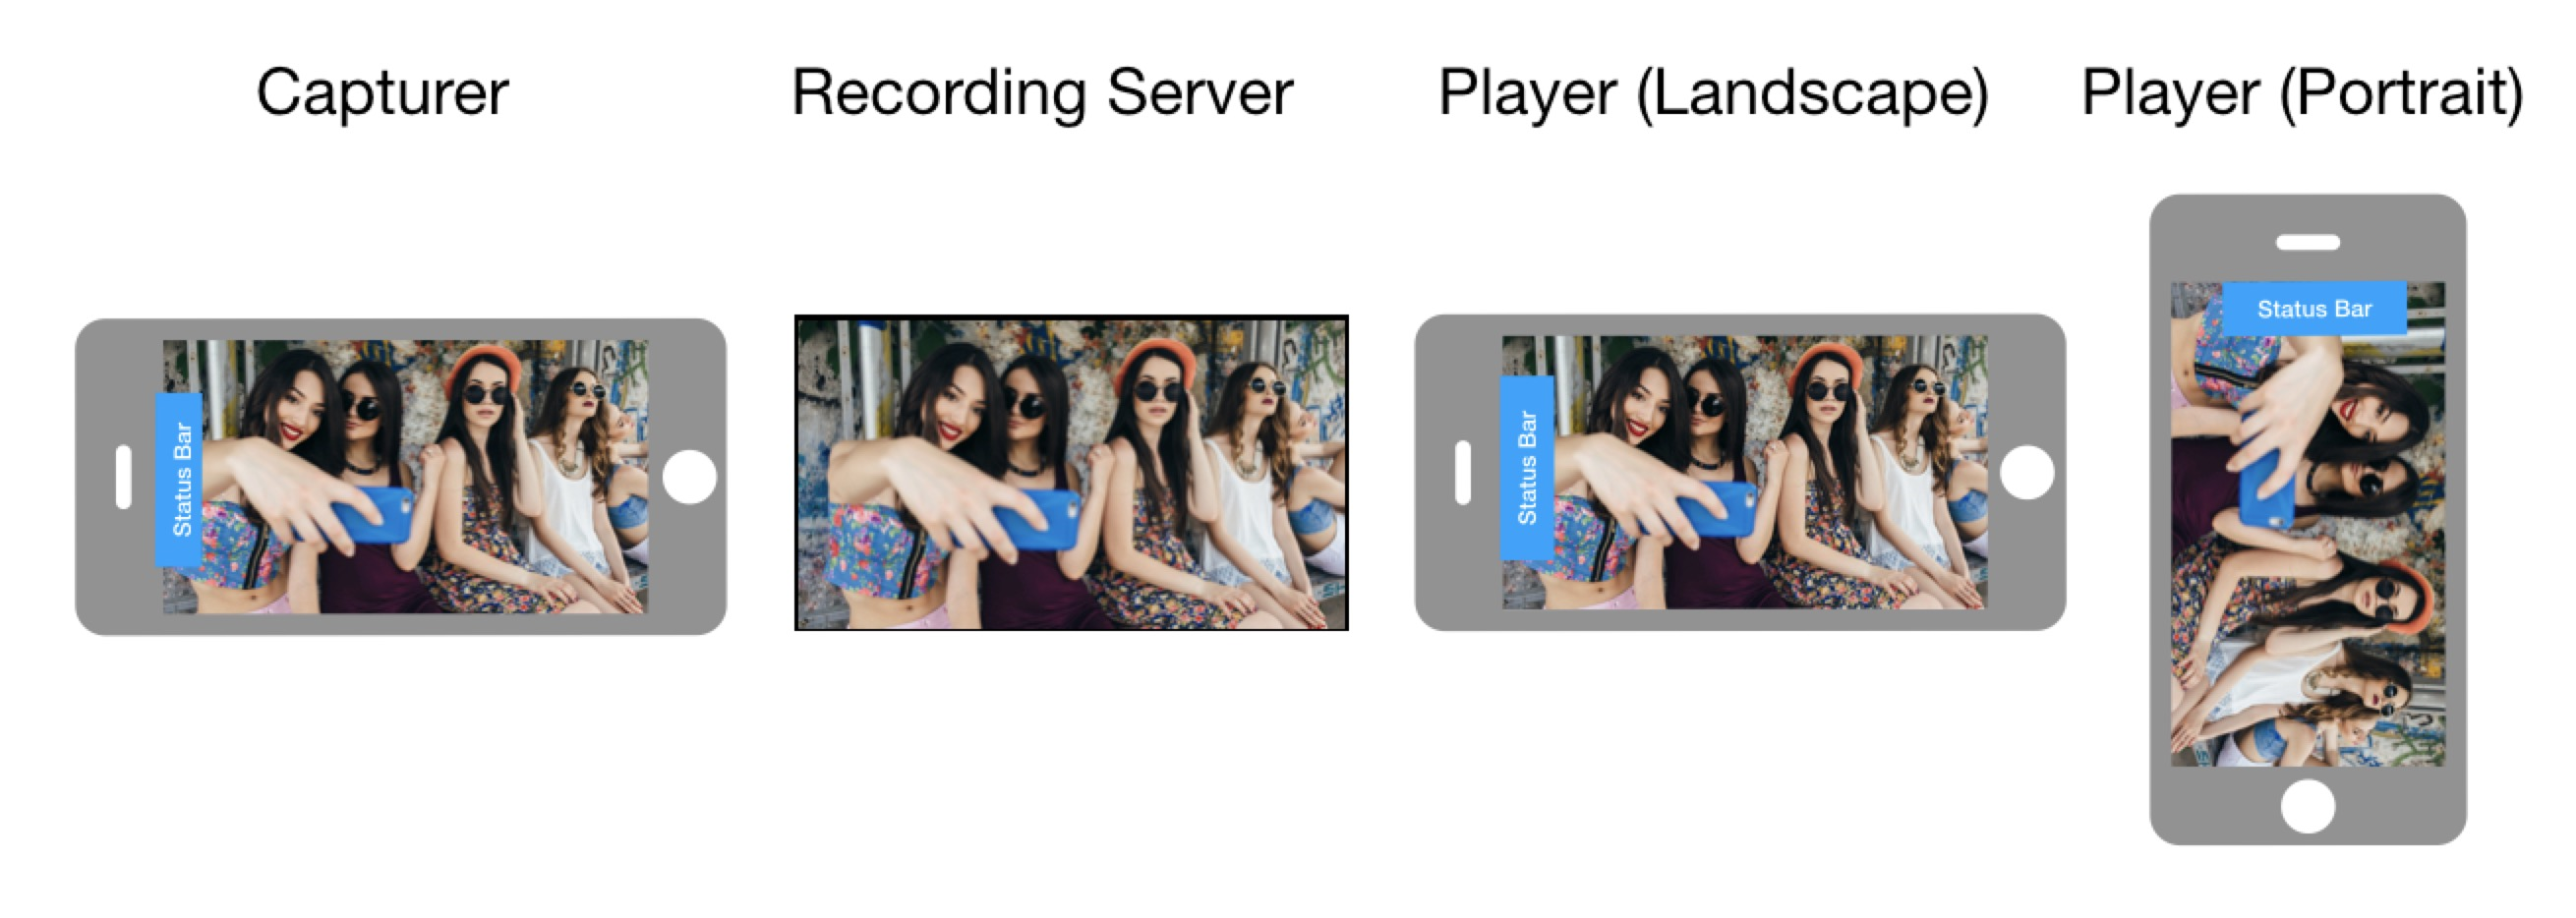
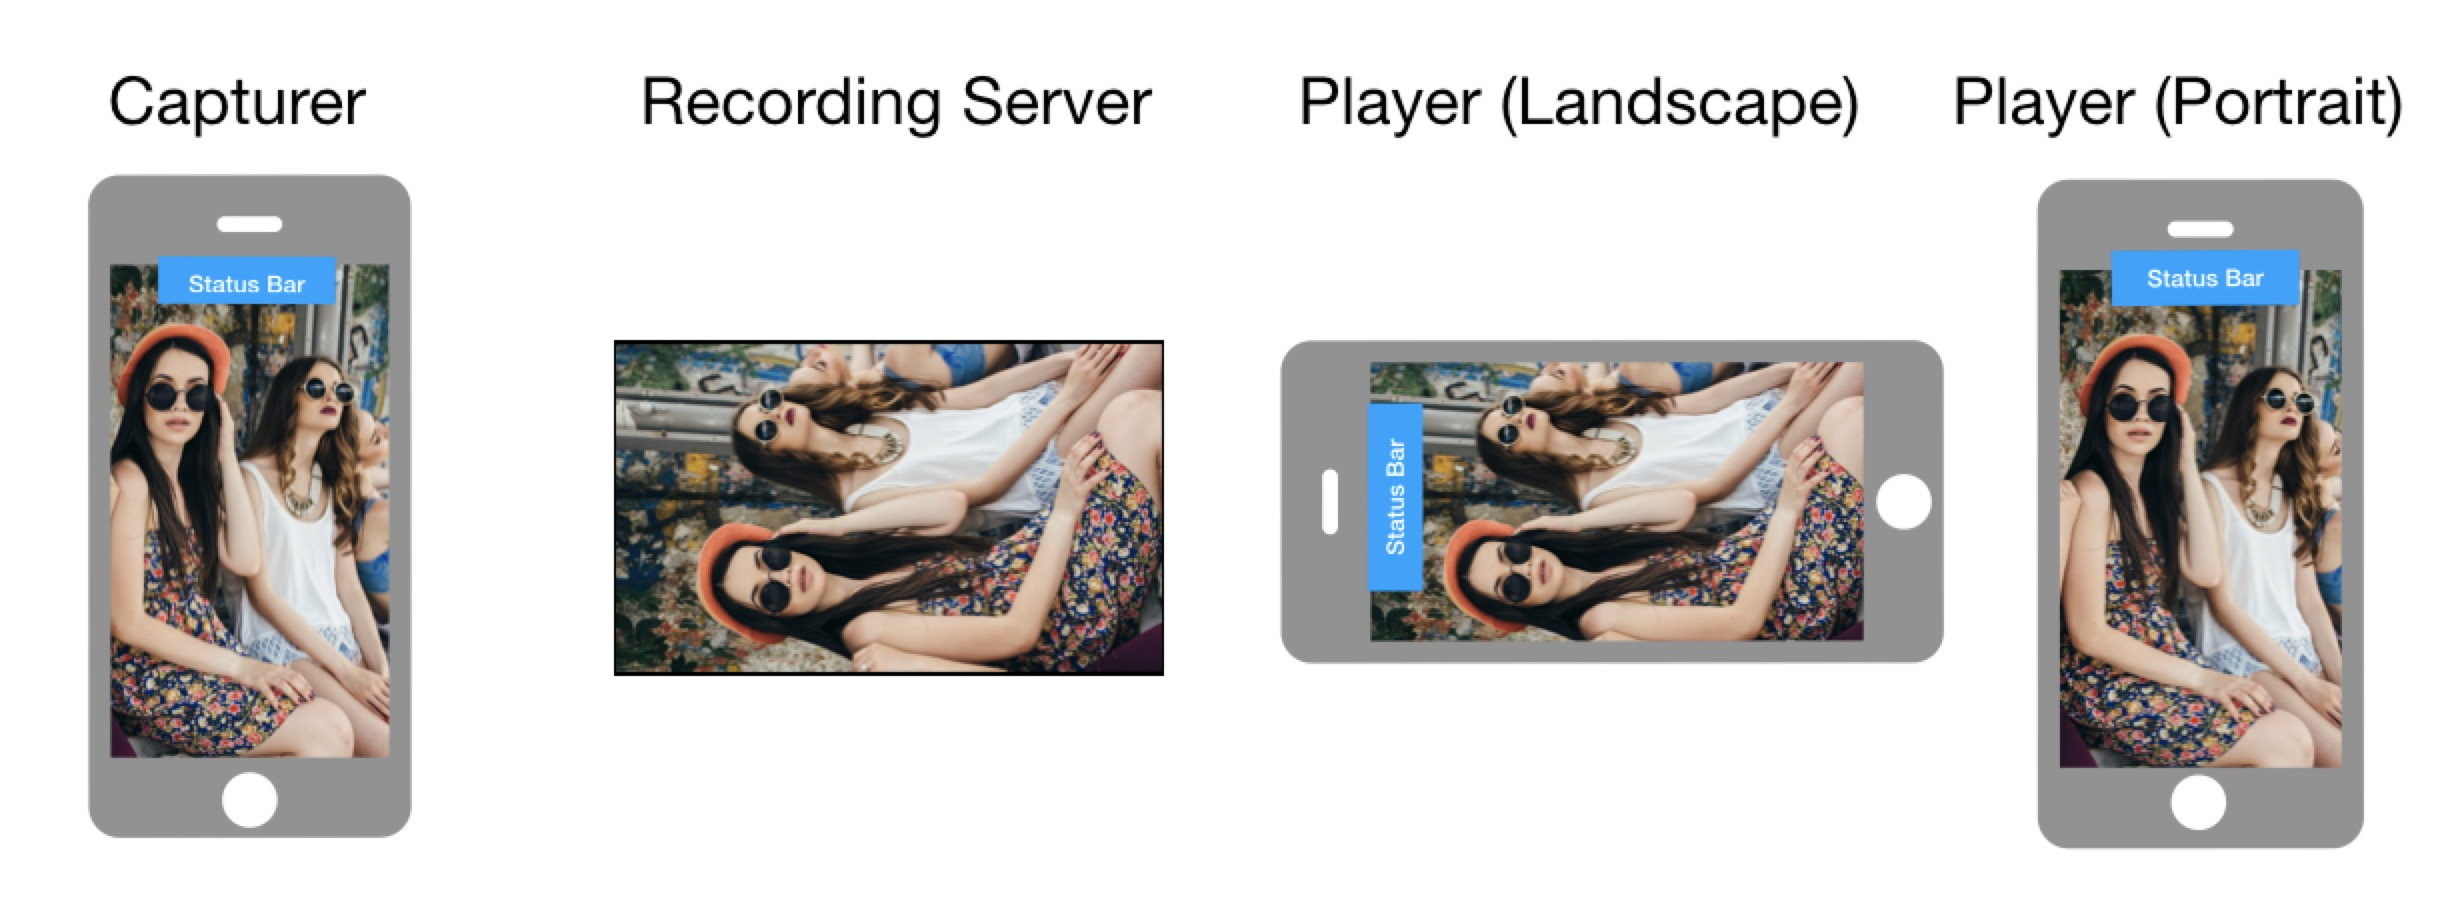
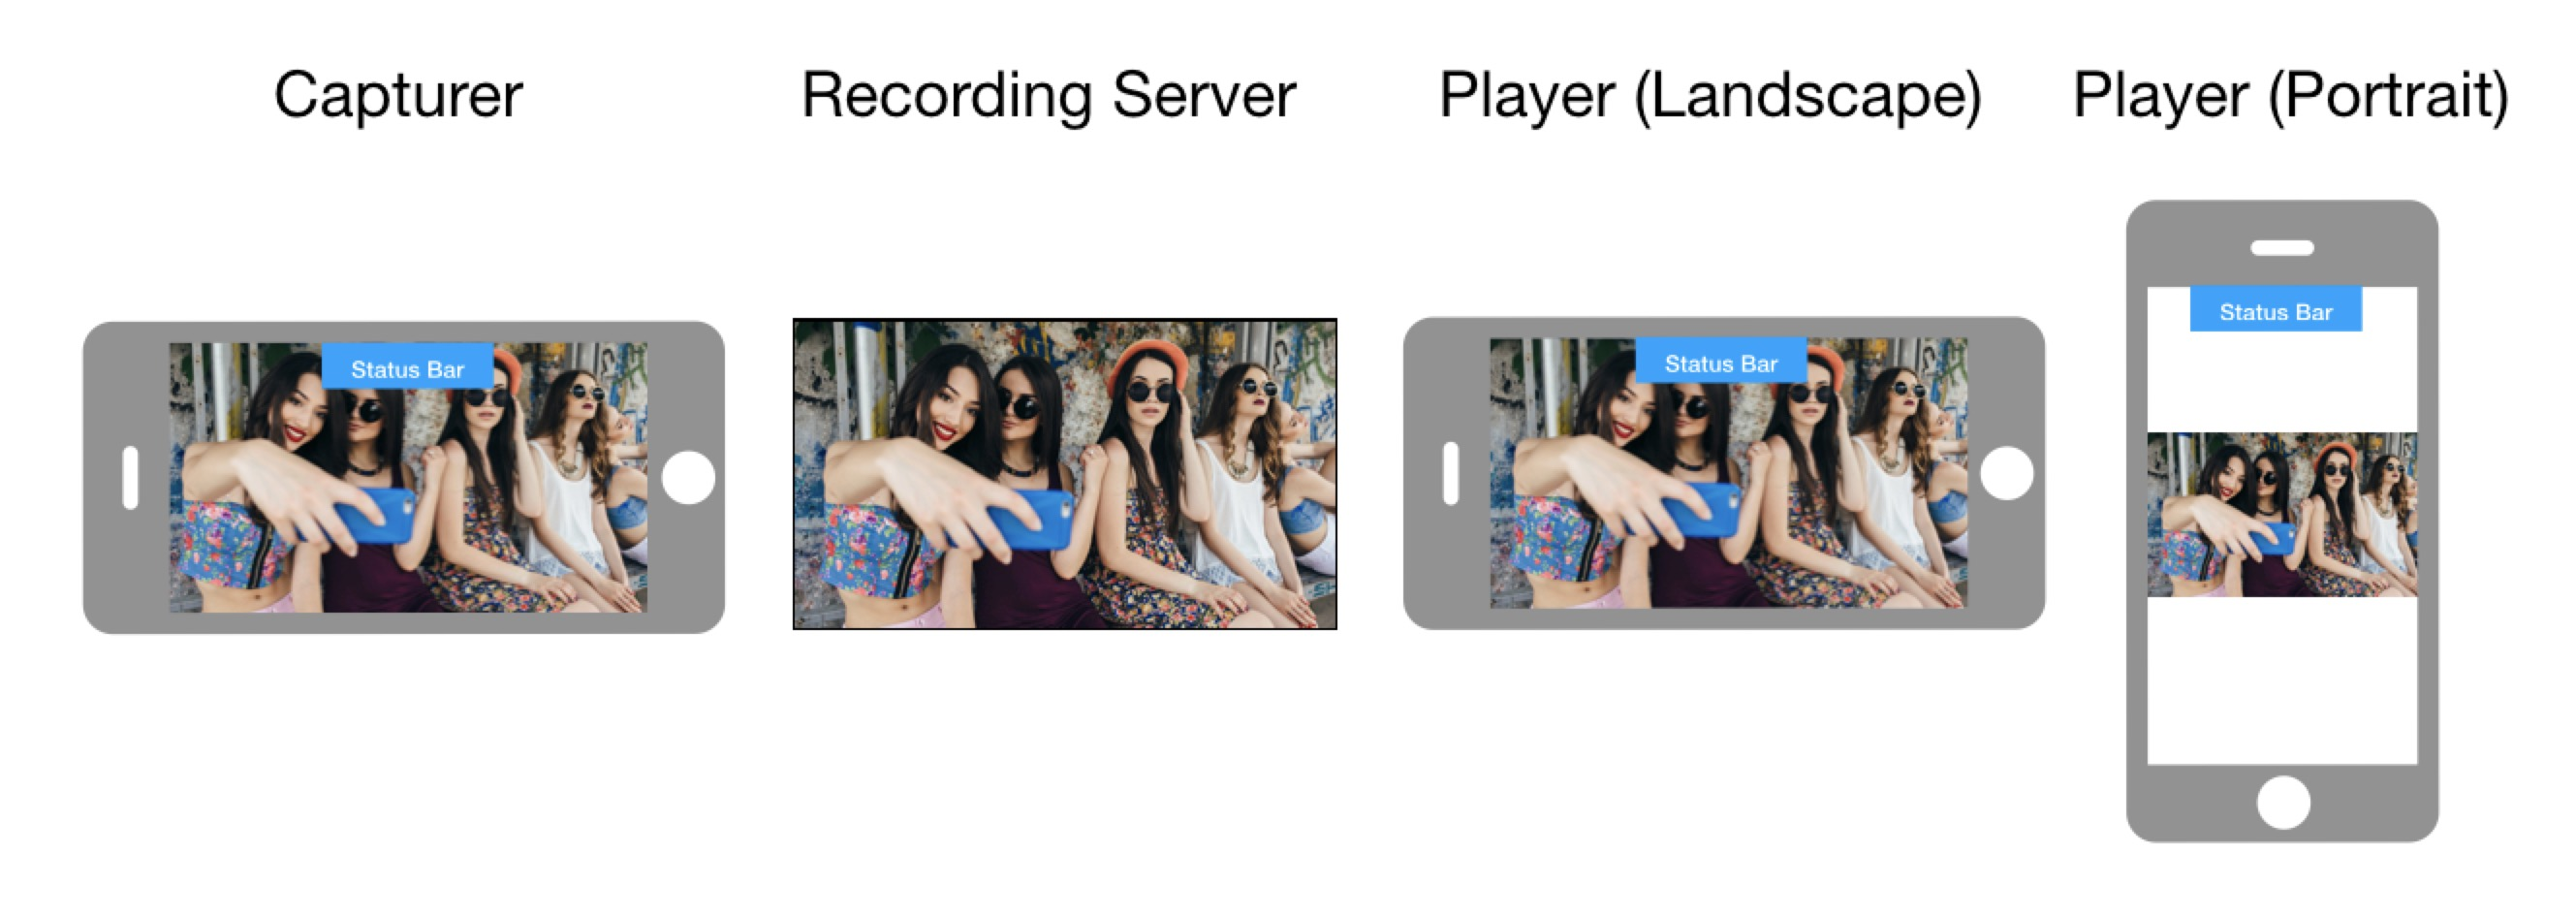
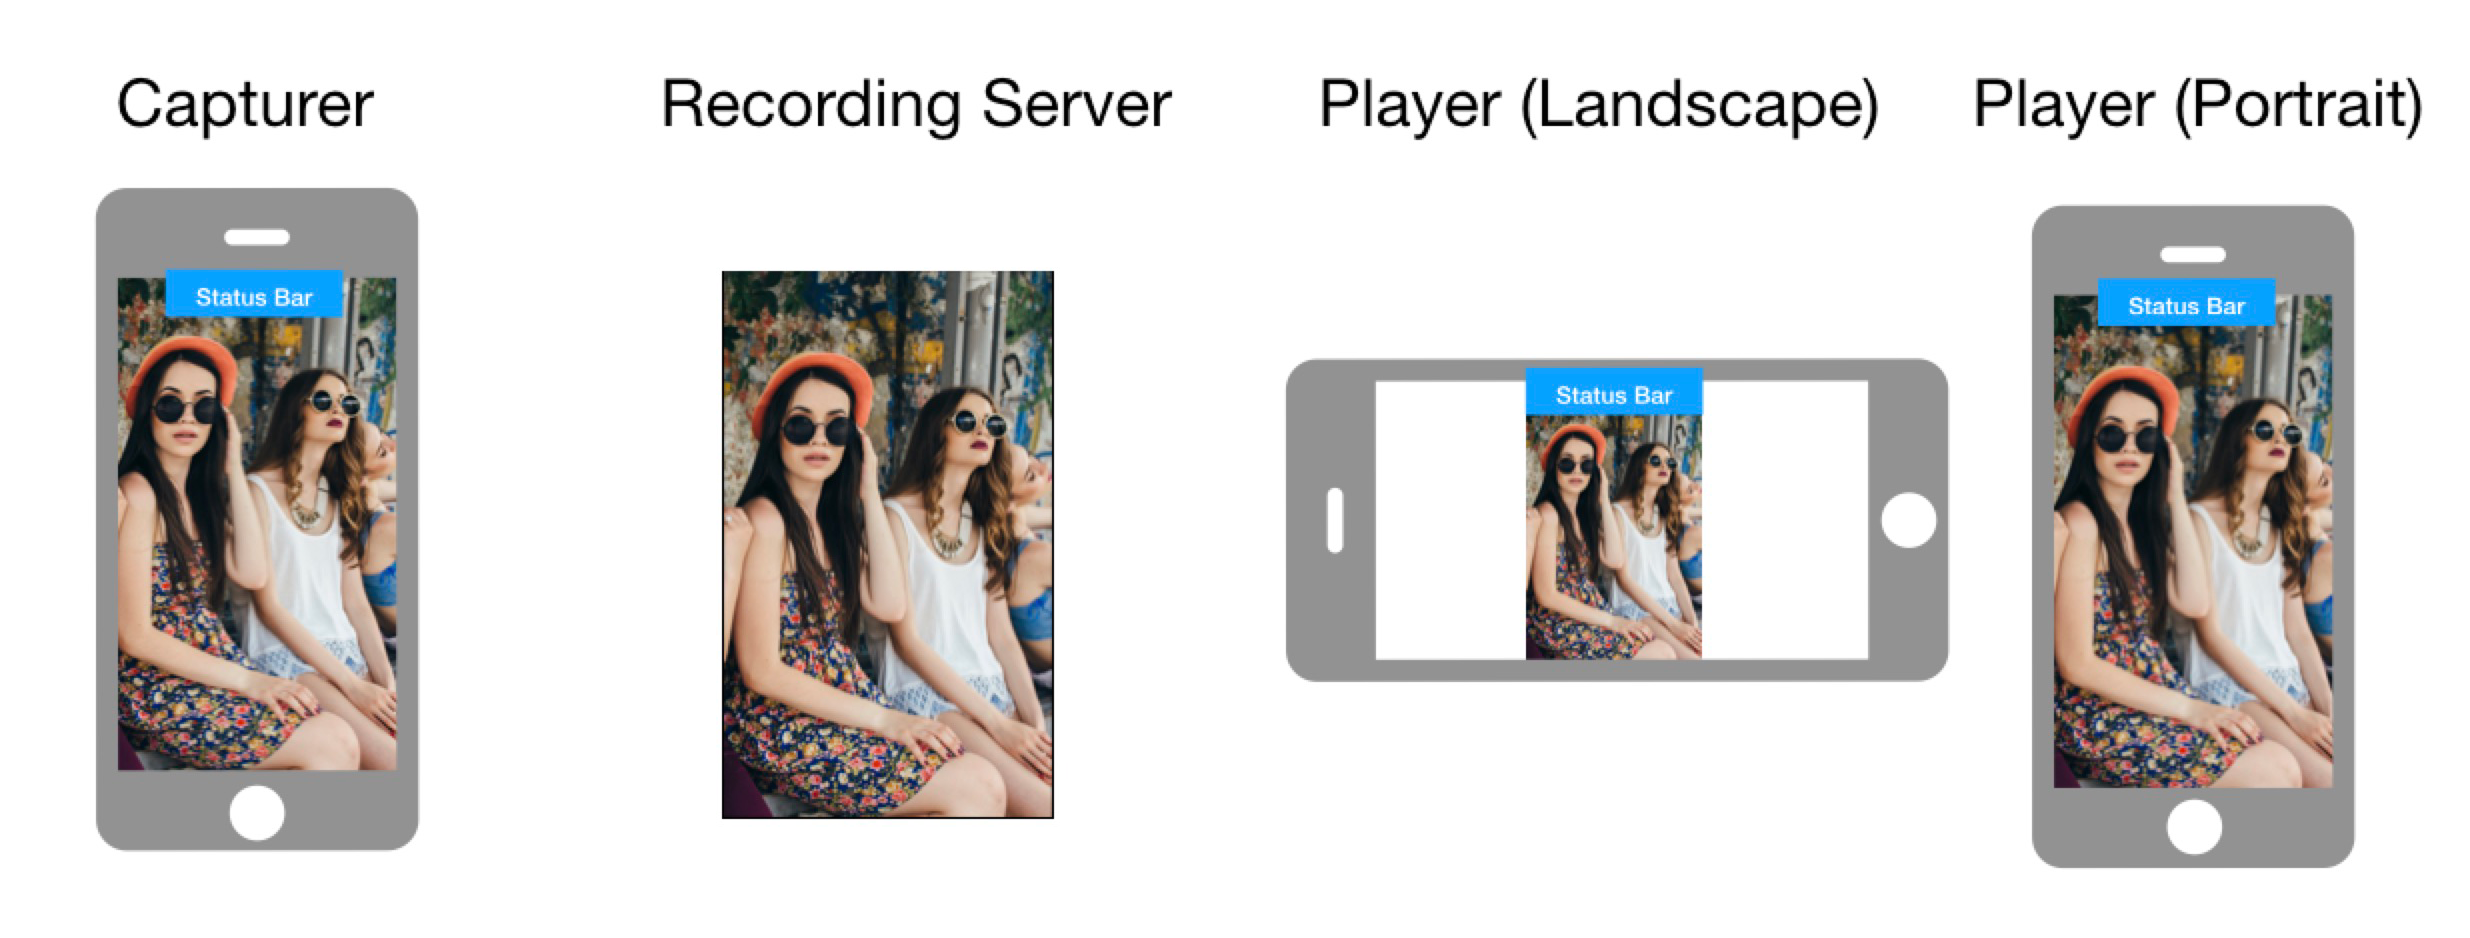
The way video is displayed on the playing device depends on orientationMode used on the encoding device, orientation of the capturing device, orientation of the playing device, and whether screen rotation is enabled on the playing device. On the capturing device, you can set the orientationMode to:
-
Adaptive
In the this mode, the direction of the video output is consistent with the direction of the captured video. The receiving end rotates the video based on the received video rotation information. This mode is suitable for scenarios where the receiving end can adjust the video direction. No matter which mode you choose, Video SDK ensures that the relative position of the video and the status bar is always consistent at the capturing end and playback end.
-
Fixed Portrait
In this mode, the output video is always in landscape mode relative to the Status Bar. If the captured video is in portrait mode, the video encoder crops it. This method is suitable for situations where the receiving end cannot process the rotation information.
-
Fixed Landscape
In this mode, the output video is always in portrait mode relative to the Status Bar. If the captured video is in landscape mode, the video encoder crops it. This method is suitable for situations where the receiving end cannot process the rotation information.
The following images illustrate different combinations.
Orientation mode: Adaptive
-
Screen rotation: Disabled
-
Capturing device orientation: Landscape

-
Screen rotation: Disabled
-
Capturing device orientation: Portrait

-
Screen rotation: Enabled
-
Capturing device orientation: Landscape

-
Screen rotation: Enabled
-
Capturing device orientation: Portrait

Orientation mode: Landscape
-
Capturing device orientation: Landscape

-
Capturing device orientation: Portrait

Orientation mode: Portrait
-
Capturing device orientation: Portrait

-
Capturing device orientation: Landscape

Degradation preference
To enhance the video experience for users in low-bandwidth conditions, the Video SDK offers the degradationPreference parameter. This parameter allows you to set your preference for video encoding downgrade when bandwidth is limited.
Mirror mode
By default, Video SDK does not mirror the video during encoding. You use the mirrorMode parameter to decide whether to mirror the video that remote users see.
Minimum encoding frame rate
For specific requirements related to video quality or transmission frame rate, adjust the minimum encoding frame rate parameter minBitrate. It sets the minimum video encoding bitrate in Kbps. The Video SDK performs bitrate adaptation based on network conditions. Increasing this parameter beyond the default value compels the video encoder to produce high-quality images, but it may lead to increased packet loss, affecting video playback smoothness.
minBitrate meets the requirements of most real-time scenarios. For general scenarios, Agora suggests not changing the default value.Prerequisites
Ensure that you have implemented the SDK quickstart in your project.
Implement video encoder configuration
Use the setVideoEncoderConfiguration method to configure video encoding parameters. Best practice is to call this method before calling enableVideo to speed up the time required for the first frame to appear. Alternatively, call this method within the channel to flexibly adjust video encoding properties.
To set video encoder configuration, refer to the following code:
Reference
This section contains content that completes the information on this page, or points you to documentation that explains other aspects to this product.
Video profiles table
Video SDK provides a selection of video dimensions and frame rates to choose from. You can also customize the values according to the following table:
| Resolution (width × height) | Frame rate (fps) |
|---|---|
| 160 × 120 | 15 |
| 120 × 120 | 15 |
| 320 × 180 | 15 |
| 180 × 180 | 15 |
| 240 × 180 | 15 |
| 320 × 240 | 15 |
| 240 × 240 | 15 |
| 424 × 240 | 15 |
| 640 × 360 | 15 |
| 360 × 360 | 15 |
| 640 × 360 | 30 |
| 360 × 360 | 30 |
| 480 × 360 | 15 |
| 480 × 360 | 30 |
| 640 × 480 | 15 |
| 480 × 480 | 15 |
| 640 × 480 | 30 |
| 480 × 480 | 30 |
| 848 × 480 | 15 |
| 848 × 480 | 30 |
| 640 × 480 | 10 |
| 960 × 540 | 15 |
| 960 × 540 | 30 |
| 1280 × 720 | 15 |
| 1280 × 720 | 30 |
| 960 × 720 | 15 |
| 960 × 720 | 30 |
| 1920 × 1080 | 15 |
| 1920 × 1080 | 30 |
| 1920 × 1080 | 60 |
| 2560 × 1440 | 30 |
| 2560 × 1440 | 60 |
| 3840 × 2160 | 30 |
| 3840 × 2160 | 60 |
After you set the resolution and frame rate, the SDK automatically sets the corresponding bitrate. Agora does not recommend that you modify the bitrate manually.
Sample project
Agora provides open source sample projects for your reference. Download or view the JoinChannelVideo source code for a more detailed example.